Difference between revisions of "Template:T1 ToneMatch® Audio Engine to Model II and Compact Wireless"
m (New page: <noinclude> Usage: <pre> {{T1 ToneMatch® Audio Engine to Model II and Compact Wireless |Model=Model II }} </pre> </noinclude> {{T1 icon}}{{Model 1S icon}}{{Model II icon}}{{Compact icon}}...) |
m |
||
| Line 13: | Line 13: | ||
</big> | </big> | ||
<html></div></html> | <html></div></html> | ||
| − | + | When running a {{{Model|Model 1S}}} system and {{Compact}} with the same source ([[Dual Mono]]) is not recommended unless the L1®s are at least 20 feet apart. Also, when using a full sized L1® and a Compact, if the Compact is really close to the full sized system, you may not notice much of the sound of the Compact. | |
[[Image:Model II 2 Compact Wireless.png]] | [[Image:Model II 2 Compact Wireless.png]] | ||
| Line 24: | Line 24: | ||
<td style="width:400px;vertical-align:top"> | <td style="width:400px;vertical-align:top"> | ||
;Compact | ;Compact | ||
| − | Connect the Compact | + | Connect the T1® to the Compact using a wireless transmitter and receiver. |
| − | * T1® Master Output to the {{Compact}} Channel 2 input. <br>[[Image:Compact Channel 2 Line Level2.png]] | + | * T1® Master Output to the wireless transmitter. |
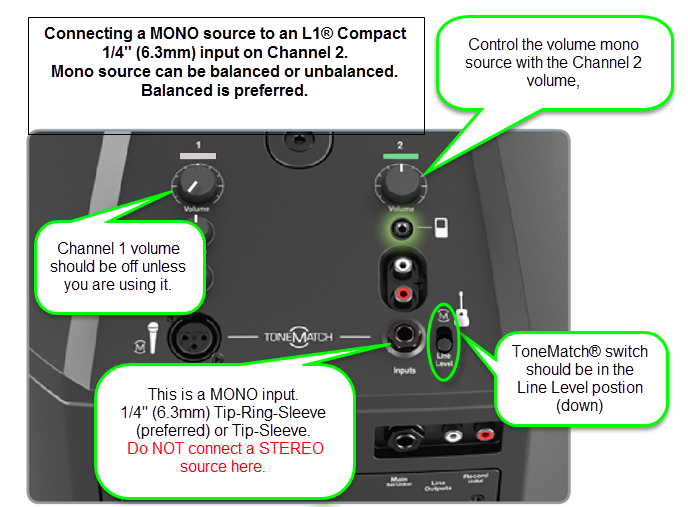
| + | * Connect wireless receiver to to the {{Compact}} Channel 2 input. <br>[[Image:Compact Channel 2 Line Level2.png]] | ||
** Set the Channel 2 volume "5" and adjust as necessary to get a good balance with the other system. | ** Set the Channel 2 volume "5" and adjust as necessary to get a good balance with the other system. | ||
** If you are seeing red on the Channel 2 LED light, turn down the volume on the Compact. | ** If you are seeing red on the Channel 2 LED light, turn down the volume on the Compact. | ||
** If you are using Compact Channel 1, turn the Channel 1 volume all the way off. | ** If you are using Compact Channel 1, turn the Channel 1 volume all the way off. | ||
| − | ** For best results | + | ** For best results: If the wireless receiver has ¼ inch jack Tip-Ring-Sleeve (balanced) connection use a ¼ inch jack Tip-Ring-Sleeve cable between the wireless receiver and the Compact. <br />[[Image:TrsMtrsM.png]]<br />You can use a Tip-Sleeve (unbalanced connection) but the Tip-Ring-Sleeve (balanced connection is preferred). |
</td></tr> | </td></tr> | ||
</table> | </table> | ||
Revision as of 20:18, 13 March 2015
Usage:
{{T1 ToneMatch® Audio Engine to Model II and Compact Wireless
|Model=Model II
}}
Please note: Bose recommends that if you have two full sized L1® systems using the same source, that you place those systems at least 20 feet apart (6 meters). This is to avoid Multiple Source Interference.
When running a Model 1S system and L1 Compact with the same source (Dual Mono) is not recommended unless the L1®s are at least 20 feet apart. Also, when using a full sized L1® and a Compact, if the Compact is really close to the full sized system, you may not notice much of the sound of the Compact.
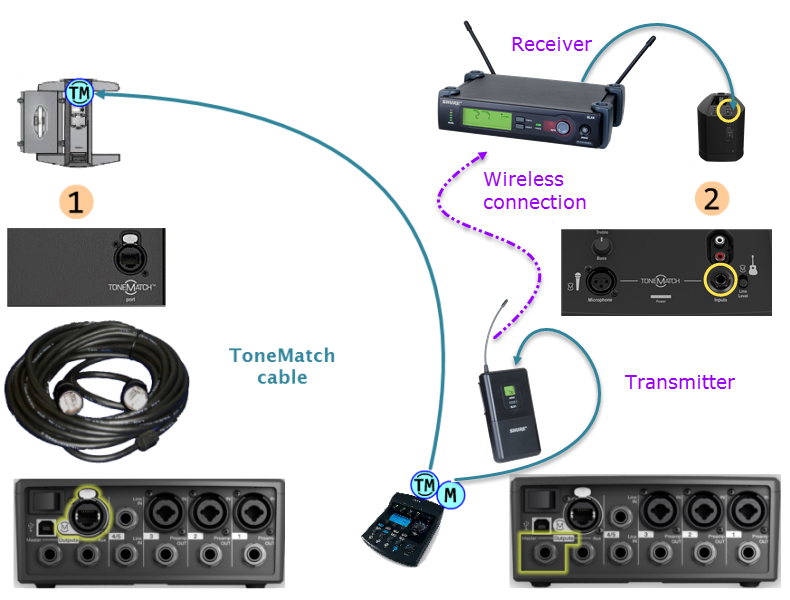
Connect the first system with the ToneMatch cable that came with the T1®.
|
Connect the T1® to the Compact using a wireless transmitter and receiver.
|


