Difference between revisions of "Template:L1 Pro"
m (→L1 Mix App) |
m (→Quick Tips) |
||
| (35 intermediate revisions by the same user not shown) | |||
| Line 4: | Line 4: | ||
<div>__TOC__ | <div>__TOC__ | ||
| − | The L1 Pro models share a common user interface and the L1 | + | The L1 Pro models share a common user interface and the L1 App. This page has links to resources for all three models and the Bose products that integrate with them. |
| + | |||
| + | If you have an L1 Pro, check out the [[L1 Pro FAQ|L1 Pro Frequently Asked Questions]] | ||
</div> | </div> | ||
<div> | <div> | ||
| Line 10: | Line 12: | ||
== L1 Pro Family == | == L1 Pro Family == | ||
| − | Bose Pro announced the Bose L1 Pro line | + | Bose Pro announced the Bose L1 Pro line on October 26, 2020. |
| − | [[File:Bose L1 Pro Family.jpg|600px|link=https:// | + | [[File:Bose L1 Pro Family.jpg|600px|link=https://boseprofessional.com/product-category/portable-pa|Bose L1 Pro page bose.com]] |
<!-- --> | <!-- --> | ||
| − | [https:// | + | [https://boseprofessional.com/products/portable-pa/software-portable-pa/bose-music-app/bose-music-app Bose App] to control L1 Pro and S1 Pro+ |
<HTML> | <HTML> | ||
| − | <a href="https://apps.apple.com/us/app/ | + | <a href="https://apps.apple.com/us/app/bose/id1364986984"> |
<img src="https://assets.bose.com/content/dam/Bose_DAM/Web/consumer_electronics/global/general/icons/QCEB_PP_Apple_App_Store_Badge_fl_2x1_web.png/jcr:content/renditions/original" style="height:3em;" | <img src="https://assets.bose.com/content/dam/Bose_DAM/Web/consumer_electronics/global/general/icons/QCEB_PP_Apple_App_Store_Badge_fl_2x1_web.png/jcr:content/renditions/original" style="height:3em;" | ||
</a> | </a> | ||
| − | <a href="https://play.google.com/store/apps/details?id=com.bose. | + | <a href="https://play.google.com/store/apps/details?id=com.bose.bosemusic"> |
<img src="https://assets.bose.com/content/dam/Bose_DAM/Web/consumer_electronics/global/general/icons/QCEB_PP_Google_Play_Badge_fl_2x1_web.png/jcr:content/renditions/original" style="height:3em;"> | <img src="https://assets.bose.com/content/dam/Bose_DAM/Web/consumer_electronics/global/general/icons/QCEB_PP_Google_Play_Badge_fl_2x1_web.png/jcr:content/renditions/original" style="height:3em;"> | ||
</a> | </a> | ||
| + | |||
</html> | </html> | ||
| Line 30: | Line 33: | ||
[[File:ToneMatch_Mixers_Family_Ortho_Top_halfRes.jpg|link=T4S/T8S ToneMatch® Mixer|200px|class=hero|Learn about the T4S/T8S ToneMatch mixer]] | [[File:ToneMatch_Mixers_Family_Ortho_Top_halfRes.jpg|link=T4S/T8S ToneMatch® Mixer|200px|class=hero|Learn about the T4S/T8S ToneMatch mixer]] | ||
| + | |||
| + | If you have an L1 Pro, check out the [[#FAQ|L1 Pro Frequently Asked Questions]] | ||
| Line 37: | Line 42: | ||
=== Documentation === | === Documentation === | ||
{{L1 Pro Documentation}} | {{L1 Pro Documentation}} | ||
| + | |||
| + | === L1 Pro Firmware === | ||
| + | [[L1 Pro Firmware]] | ||
| + | |||
=== Resources === | === Resources === | ||
| Line 52: | Line 61: | ||
[https://www.youtube.com/watch?v=GZGRwhRXRNc L1 Pro and the Mobile DJ - video] | [https://www.youtube.com/watch?v=GZGRwhRXRNc L1 Pro and the Mobile DJ - video] | ||
| − | + | <!-- | |
[https://community.bose.com/t5/Portable-PA/bd-p/PortablePA Bose Pro Portable PA Community] | [https://community.bose.com/t5/Portable-PA/bd-p/PortablePA Bose Pro Portable PA Community] | ||
| − | + | --> | |
[https://proedu.bose.com/pages/60/l1-pro-series-certification-course L1 Pro Technical Certification Course] (no charge, but you must register) | [https://proedu.bose.com/pages/60/l1-pro-series-certification-course L1 Pro Technical Certification Course] (no charge, but you must register) | ||
| Line 68: | Line 77: | ||
[[L1 Pro Do You Need All Three]] | [[L1 Pro Do You Need All Three]] | ||
| + | |||
| + | [[Two L1 Pro16 or One L1 Pro32]] | ||
| + | |||
| + | [[S1 Pro+ x 2 vs L1 Pro8 with T4S]] | ||
[[Bose L1 Pro for Singer/Songwriter/Electric Guitarist|Which L1 Pro for Singer/Songwriter/Electric Guitarist]] | [[Bose L1 Pro for Singer/Songwriter/Electric Guitarist|Which L1 Pro for Singer/Songwriter/Electric Guitarist]] | ||
| Line 73: | Line 86: | ||
[[T1 Compatibility With L1 Pro Systems]] | [[T1 Compatibility With L1 Pro Systems]] | ||
| − | [[L1 Pro | + | [[Mixer to L1 Pro]] Connect your third-party mixer to any L1 Pro |
[[L1 Pro and SimpleSync]] Connect L1 Pro to Bose Smart Speaker Group | [[L1 Pro and SimpleSync]] Connect L1 Pro to Bose Smart Speaker Group | ||
| Line 82: | Line 95: | ||
===Comparing Specifications === | ===Comparing Specifications === | ||
| + | {{Comparing L1 Pro Models}} | ||
| + | <!-- | ||
==== Comparing L1 Pro Models ==== | ==== Comparing L1 Pro Models ==== | ||
[[Bose L1 Pro8 Compared to L1 Pro16]] | [[Bose L1 Pro8 Compared to L1 Pro16]] | ||
| + | |||
| + | :[[Two L1 Pro8 or One L1 Pro16]] | ||
[[Bose L1 Pro16 Compared to L1 Pro32]] | [[Bose L1 Pro16 Compared to L1 Pro32]] | ||
| + | |||
| + | :[[Two L1 Pro16 or One L1 Pro32]] | ||
[[Comparing L1 Pro Power Stands to Subs]] | [[Comparing L1 Pro Power Stands to Subs]] | ||
| Line 100: | Line 119: | ||
[[Throw Over Distance]] | [[Throw Over Distance]] | ||
| + | |||
| + | --> | ||
=== Quick Tips=== | === Quick Tips=== | ||
| Line 105: | Line 126: | ||
==== L1 Pro Line Out ==== | ==== L1 Pro Line Out ==== | ||
{{L1 Pro Line Out}} | {{L1 Pro Line Out}} | ||
| + | |||
| + | ==== L1 Pro ToneMatch Switch ==== | ||
| + | ;The ToneMatch switch selects the ToneMatch Preset applied to the input. | ||
| + | It does not adjust the channel’s gain staging or level. It does not function like a MIC/LINE switch found on some powered loudspeakers or mixers | ||
| + | {{ToneMatch Switch}} | ||
==== L1 Pro Daisy Chain ==== | ==== L1 Pro Daisy Chain ==== | ||
| Line 116: | Line 142: | ||
</div> | </div> | ||
</div> | </div> | ||
| + | |||
| + | ==== L1 Pro Emergency Kit ==== | ||
| + | {{:L1 Pro Emergency Kit}} | ||
| + | |||
| + | == FAQ == | ||
| + | {{L1 Pro FAQ}} | ||
== Sub1/Sub2 == | == Sub1/Sub2 == | ||
| Line 125: | Line 157: | ||
[[S1 Pro with Sub1 or Sub2]] | [[S1 Pro with Sub1 or Sub2]] | ||
| − | == | + | == Bose App / Music App / L1 Mix App == |
| − | + | {{:Bose App}} | |
| − | |||
| − | |||
| − | |||
| − | |||
| − | |||
| − | |||
| − | |||
| − | |||
| − | |||
| − | |||
| − | |||
| − | |||
| − | |||
| − | |||
| − | |||
| − | |||
| − | |||
== ToneMatch Mixers == | == ToneMatch Mixers == | ||
Latest revision as of 12:46, 23 February 2026
Contents
- 1 L1 Pro Family
- 2 FAQ
- 3 Sub1/Sub2
- 4 Bose App / Music App / L1 Mix App
- 5 ToneMatch Mixers
- 6 Other Bose Portable PA Products
The L1 Pro models share a common user interface and the L1 App. This page has links to resources for all three models and the Bose products that integrate with them.
If you have an L1 Pro, check out the L1 Pro Frequently Asked Questions
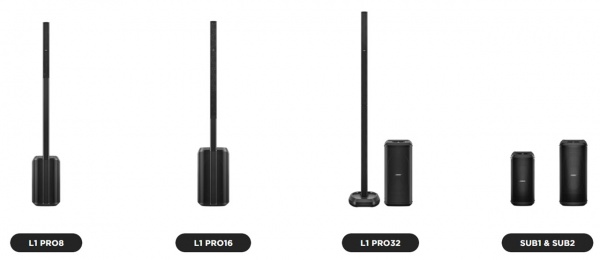
L1 Pro Family
Bose Pro announced the Bose L1 Pro line on October 26, 2020.
Bose App to control L1 Pro and S1 Pro+
![]()
![]()

If you have an L1 Pro, check out the L1 Pro Frequently Asked Questions
Documentation
L1 Pro8
L1 Pro16
L1 Pro32
Sub1/Sub2
L1 Pro Technical Data Sheets
- L1 Pro8 Technical Data Sheet
- L1 Pro16 Technical Data Sheet
- L1 Pro32 Technical Data Sheet
- Sub1 Technical Data Sheet
- Sub2 Technical Data Sheet
L1 Pro Service Manuals
L1 Pro Self-Serve Support
Application Guide
L1 Pro Firmware
Resources
L1 Pro Family Selection Guide (product comparison)
Choosing the L1 Pro System That's Right for You (Youtube) / (Facebook livecast)
Bose L1 Pro Technical Training Videos
L1 Pro and the Mobile DJ - video L1 Pro Technical Certification Course (no charge, but you must register)
Articles
Should I get an L1 Pro8 or L1 Pro16?
Should I get an L1 Pro16 or L1 Pro32?
Do I Need to Upgrade from the L1 Compact to the L1 Pro8?
Do I Need to Upgrade from the L1 Model II to the L1 Pro32?
S1 Pro+ x 2 vs L1 Pro8 with T4S
Which L1 Pro for Singer/Songwriter/Electric Guitarist
T1 Compatibility With L1 Pro Systems
Mixer to L1 Pro Connect your third-party mixer to any L1 Pro
L1 Pro and SimpleSync Connect L1 Pro to Bose Smart Speaker Group
L1 Pro32 Separating the Sections of the Mid-High Array
Comparing Specifications
Comparing L1 Pro Models
Bose L1 Pro8 Compared to L1 Pro16
Bose L1 Pro16 Compared to L1 Pro32
Comparing L1 Pro Power Stands to Subs
Legacy to L1 Pro Models
Bose L1 Compact Compared to L1 Pro8
Bose L1 Model 1S Compared to L1 Pro16
Bose L1 Model II Compared to L1 Pro32
Quick Tips
L1 Pro Line Out
The XLR Line Output from any L1 Pro contains the sound from all inputs (1, 2, 3, Bluetooth, and ToneMatch Port). That includes
- ToneMatch Presets
- Tone Controls
- Reverb
- The signal from a ToneMatch mixer connected to the ToneMatch port including ToneMatch Presets, zEQ, Reverb, Effects.
The sound is NOT affected by the L1 Pro System EQ setting.
L1 Pro ToneMatch Switch
- The ToneMatch switch selects the ToneMatch Preset applied to the input.
It does not adjust the channel’s gain staging or level. It does not function like a MIC/LINE switch found on some powered loudspeakers or mixers
ToneMatch Preset Behavior:
- MIC applies the microphone ToneMatch Preset
- INST applies the acoustic guitar ToneMatch Preset
- OFF disables ToneMatch processing
Use MIC for microphones and INST for acoustic guitar. You can change the ToneMatch Presets using the Bose App
Channel ToneMatch Button: Select the ToneMatch preset for an individual channel. The corresponding LED will illuminate white while selected.
More information about ToneMatch Presets
L1 Pro Daisy Chain
Want to connect one or more L1 Pro systems together? See L1 Pro Daisy Chain
L1 Pro System EQ
The System EQ feature on the L1 Pro systems applies an EQ preset to the master output. This is similar to a graphic equalizer on traditional analogue mixers, but it uses four presets instead for quick access. read more — L1 Pro System EQ
L1 Pro32 Half Stack
- Can I operate the L1 Pro32 with only the lower section of the line array?
- Sometimes there is not sufficient height to use the full array
- Yes
- The L1 Pro32 can be used without the upper array. This configuration is useful when a venue ceiling cannot accommodate the height of the L1 Pro32
Source: Page 7 of the L1 Pro32 Owners Guide
- For best results, ensure array is at ear level for listeners
- Unlike the L1 Model II, the L1 Pro32 automatically adjusts the level of the bass output to maintain the appropriate spectral balance.
- It’s a valid use case to use only the bottom array section. In fact, the EQ automatically adjusts to compensate.
Craig Small - Bose
- Half Stack Not Recommended for Small Gigs
Running only the lower section of the Line Array is a workaround when there isn't enough ceiling clearance to use both sections. For small gigs, turn down the volume on the L1 Pro32, don't run without the top section of the array because
- You'll need to elevate the system so the array is at ear level for the audience. Otherwise, the sound will be muffled
- You will reduce your projection over distance. The sound will drop off more over distance.
- You may need to turn up the volume louder than if you were using the full array. As a result, you increase the likelihood of feedback.
L1 Pro Emergency Kit
These are extras and spares I carry in addition to the items I know I will need at a gig.
| Item | Reason |
|---|---|
| IEC Power Cord | They got lost, and this can be used with an XLR cable to substitute for a SubMatch Cable |
| XLR cable | It's always good to have a spare. Use with an IEC Power Cord to replace a SubMatch Cable |
| 1/4-inch (6.3mm) Tip-Ring-Sleeve Cable | Connect mixers or devices with balanced connections to the L1 Pro. |
| 1/4-inch (6.3mm) Tip-Sleeve Cable | This is your basic instrument cable. It's always good to have a spare. |
| XLR Female to 1/4-inch (6.3mm) Tip-Ring-Sleeve Cable | To connect Line Level Output from an L1 Pro or third-party mixer to Channel 3 input of an L1 Pro or S1 Pro+ |
| 1/8-inch (3.5 mm) Tip-Ring-Sleeve Cable | Use this to connect the headphone output of a consumer device to L1 Pro or S1 Pro(+) channel 3 input |
| CAT5 cable | Connect ToneMatch Mixers (T1/T4S/T8S) to the L1 Pro ToneMatch Port |
| ToneMatch Power Supply | In case I need to run two ToneMatch Mixers to a single L1 Pro |
| Dynamic Microphone | This is a spare; the one to use when you have guest speakers making announcements |
| Microphone Clip | They break |
| Multi-bit Screwdriver | Tighten, loosen, everything as needed |
| Gaffers Tape | Tie down cables, or quick repairs |
| Labels with contact information | I have labels on all my gear, but it's good to have spares in case they fall off |
FAQ
General Questions
| Collapse all
Are the columns made of plastic?
Arrays on all units feature an extruded aluminum sleeve. Perforated grille on the front, solid on the back. Source: Craig Small
Can I swap the columns from different models?
No. While the column arrays and extensions of the L1 Pro8 and L1 Pro16 will fit each other, no sound comes out.
L1 Pro32, can I take off the top column?
Yes
- The L1 Pro32 can be used without the upper array. This configuration is useful when a venue ceiling cannot accommodate the height of the L1 Pro32
Source: Page 7 of the L1 Pro32 Owners Guide
- For best results, ensure the array is at ear level for listeners
- The L1 Pro32 automatically adjusts the level of the bass output to maintain the appropriate spectral balance.
- It’s a valid use case to use only the bottom array section. In fact, the EQ automatically adjusts to compensate.
Craig Small - Bose
- Half Stack Not Recommended for Small Gigs
Running only the lower section of the Line Array is a workaround when there isn't enough ceiling clearance to use both sections. For small gigs, turn down the volume on the L1 Pro32, don't run without the top section of the array because
- You'll need to elevate the system so the array is at ear level for the audience. Otherwise, the sound will be muffled
- You will reduce your projection over distance. The sound will drop off more over distance.
- You may need to turn up the volume louder than if you were using the full array. As a result, you increase the likelihood of feedback.
Inputs and Connections
| Collapse all
Is MIC/INST/OFF the same as a MIC/LINE switch?
No. The MIC/INST/OFF switch is NOT a MIC/LINE selector like those found on many powered loudspeakers.
The switch does not change input sensitivity or gain.
It affects only the ToneMatch Preset applied to the input.ToneMatch Preset Behavior:
- MIC applies the microphone ToneMatch Preset
- INST applies the acoustic guitar ToneMatch Preset
- OFF disables ToneMatch processing
Use MIC for microphones and INST for acoustic guitar. You can change the ToneMatch Presets using the Bose App
Channel ToneMatch Button: Select the ToneMatch preset for an individual channel. The corresponding LED will illuminate white while selected.
More information about ToneMatch Presets
Does the MIC/INST/OFF switch change the input gain?
No. The MIC/INST/OFF switch does not change input sensitivity or gain.
It only selects the ToneMatch Preset applied to the input.
It does not adjust the channel’s gain staging or level.ToneMatch Preset Behavior:
- MIC applies the microphone ToneMatch Preset
- INST applies the acoustic guitar ToneMatch Preset
- OFF disables ToneMatch processing
Use MIC for microphones and INST for acoustic guitar. You can change the ToneMatch Presets using the Bose App
Channel ToneMatch Button: Select the ToneMatch preset for an individual channel. The corresponding LED will illuminate white while selected.
More information about ToneMatch Presets
How do I connect a monitor?
* You can connect the L1 Pro Line Out to a monitor.
The XLR Line Output from any L1 Pro contains the sound from all inputs (1, 2, 3, Bluetooth, and ToneMatch Port). That includes
- ToneMatch Presets
- Tone Controls
- Reverb
- The signal from a ToneMatch mixer connected to the ToneMatch port including ToneMatch Presets, zEQ, Reverb, Effects.
The sound is NOT affected by the L1 Pro System EQ setting.
- If you have an S1 Pro, see L1 Pro to S1 Pro
- If you have an S1 Pro+, see L1 Pro to S1 Pro+
- If you prefer to run your inputs to the S1 Pro+ and send the output to the L1 Pro, see S1 Pro+ To L1 Pro
- If you have a mixer, you may prefer to send the monitor mix from the mixer to the monitors instead of the L1 Pro Line Out
The L1 Pro was designed to be placed behind the performers. If you can do that, you may not need a monitor — you should be able to hear yourself clearly. For more about that, see The L1® Approach and the History Of Amplification.
How do I connect a third‑party mixer to the L1 Pro?
Use the Mixer Mono Output and connect it to L1 Pro Channel 3.
If the mixer does not have a mono output, pan all inputs hard LEFT and use the LEFT output. We will now refer to that as the Mixer Mono Out.
If the mixer has XLR outputs:
- Mixer Mono Out → XLR Female → ¼″ (6.3 mm) Tip‑Ring‑Sleeve → L1 Pro Channel 3
If the mixer has ¼″ (6.3 mm) Tip‑Ring‑Sleeve outputs:
- Mixer Mono Out → ¼″ (6.3 mm) Tip‑Ring‑Sleeve → L1 Pro Channel 3
For more details, see Mixer to L1 Pro.
Can I use XLR cables from my mixer into Channels 1 or 2?
You can, and it might work. Click for details
And yes, there are even pictures of this in the L1 Pro manuals.
However, using XLR‑to‑XLR connections from a mixer into Channels 1 or 2 can lead to problems.
1. Some mixers have a MIC/LINE or ‑20 dB switch on the XLR output
If your mixer can switch its XLR output to MIC or ‑20 dB, then engage that switch and the XLR‑to‑XLR connection should work.
If not, use Mixer Mono Out → XLR Female → ¼″ (6.3 mm) Tip‑Ring‑Sleeve → L1 Pro Channel 3.
2. Most mixer XLR outputs are line‑level, which is a poor match for the L1 Pro’s mic‑level XLR inputs
This mismatch can cause:
- Input clipping
- Harsh distortion
- Unpredictable behavior
3. You can sometimes “make it work,” but it’s not ideal
You might avoid clipping by:
- Turning down the mixer output
- Turning down the L1 Pro channel volume
However:
- Lower mixer output reduces signal‑to‑noise ratio (more hiss)
- Very low L1 Pro channel settings give almost no usable range
- Volume may jump from too quiet → too loud with tiny adjustments
4. Channel 3 avoids all of these issues
Channel 3 is designed for line‑level sources and provides:
- Proper level matching
- Lower input sensitivity (less likely to clip/distort)
- Full +24 dBu headroom
- Predictable behavior
- No ToneMatch presets
- No Reverb
- No DSP gain steps
This is why the recommended method is:
- Mixer Mono Out → XLR Female → ¼″ (6.3 mm) Tip‑Ring‑Sleeve → L1 Pro Channel 3
Why are the ¼″ (6.3 mm) Tip‑Ring‑Sleeve inputs on Channels 1 and 2 louder than the ¼″ (6.3 mm) Tip‑Ring‑Sleeve input on Channel 3?
By design, the input sensitivity of the Channel 3 ¼″ (6.3 mm) Tip‑Ring‑Sleeve input is lower than the ¼″ (6.3 mm) Tip‑Ring‑Sleeve inputs on Channels 1 and 2. This allows Channel 3 to handle line‑level sources with less risk of clipping.
You can achieve the same overall output level from Channel 3, but you may need to turn the Channel 3 volume control higher to do it.
This difference is most noticeable when connecting a third‑party mixer to the L1 Pro.
People tend to hear louder as better, so you may prefer to use Channels 1 and 2 instead of 3, but you can get the same result by turning up the volume on Channel 3, leaving the other channels available.
For more information, see Mixer to L1 Pro.
Multiple L1 Pro Systems
| Collapse all
What can and can’t multiple L1 Pros do together?
Multiple L1 Pros can be used together, but each system still operates independently.
- What they can do
- Pass audio from one unit to another using the L1 Pro Line Out (Daisy Chain)
- With a mixer
- Play the same signal if you feed each unit from a mixer
- Work as a stereo pair when fed LEFT and RIGHT outputs from a mixer
What they can’t do
- Share their internal inputs with each other
- Combine all inputs from two units into one system
- Link wirelessly over Bluetooth (Bluetooth is receive‑only)
For details on specific setups, see the related questions below.
How do I connect one L1 Pro to another L1 Pro (daisy chain)?
Use XLR Female → ¼″ (6.3 mm) Tip‑Ring‑Sleeve to connect
- From the first L1 Pro Line Out
- To the second L1 Pro Channel 3 ¼″ (6.3 mm) Tip‑Ring‑Sleeve input.
For complete details, see L1 Pro Daisy Chain.
Can I use Bluetooth to connect two L1 Pros?
No.
L1 Pro systems can receive Bluetooth audio from a Bluetooth source (for example, a phone, tablet, or computer). They cannot send Bluetooth to another L1 Pro, and even if they could, the latency (delay) would make this unusable in a live sound setting.
For more information see L1 Pro Daisy Chain
Can I run two L1 Pros as a single mono system?
No, you need a mixer to do this.
An L1 Pro cannot link its inputs or internal mix to another L1 Pro. Each unit only plays the signals connected to its own inputs.
If you want both L1 Pros to play the same mono mix, use a mixer and send the same output to each unit:
- From the mixer Mono Output → L1 Pro (Left) Channel 3 ¼″ (6.3 mm) Tip‑Ring‑Sleeve input
- From the mixer Mono Output → L1 Pro (Right) Channel 3 ¼″ (6.3 mm) Tip‑Ring‑Sleeve input
This gives you two identical mono feeds, but the L1 Pros still operate as separate systems.
For more details, see Dual Mono.
How do I connect two L1 Pros for stereo?
To run two L1 Pros in stereo, send the LEFT and RIGHT outputs from your mixer to each L1 Pro separately.
- From the mixer LEFT Output → L1 Pro (Left) Channel 3 ¼″ (6.3 mm) Tip‑Ring‑Sleeve input
- From the mixer RIGHT Output → L1 Pro (Right) Channel 3 ¼″ (6.3 mm) Tip‑Ring‑Sleeve input
Each L1 Pro then reproduces its own channel (Left or Right), creating a stereo pair.
For more details, see Mixer to L1 Pro.
Can I connect my L1 Pros so they share inputs?
You can't.
- You cannot take the three inputs on each L1 Pro and hear all six inputs through both units.
- While you can daisy chain the inputs of the first L1 Pro to a second L1 Pro, you cannot send the inputs of the second L1 Pro back to the first. Doing so will create a feedback loop.
For more details, see L1 Pro Daisy Chain.
Can I run two L1 Pros in mono without a mixer?
You can't.
There is no way to link two L1 Pros so they both play the same mono signal without using an external mixer.
Each L1 Pro only plays the signals connected to its own inputs.
If you need both L1 Pros to reproduce the same mono mix, you must use a mixer and send the same output to each unit.
For more details, see Mixer to L1 Pro.
Troubleshooting
| Collapse all
The L1 Pro sounds muddy
- Symptoms
No mid-highs, low volume, it's all bass
- Possible Causes
L1 Pro speaker column or extension not seated properly.
- Solutions
Make sure the column arrays are seated firmly in the power stand
Excessive Hiss
Hiss with nothing connected to the L1 Pro inputs when I turn up the volume
- Symptoms
Hiss with nothing connected, volume turned up
- Possible Causes
with no input, turning up the volume amplifies noise
- Solutions
turn down the volume or mute any unused channels For more details see L1 Pro Hiss
Hiss when connecting the LINE OUT from an L1 Pro to a second L1 Pro with an XLR cable
- Symptoms
Hiss, noise, clipping
- Possible Causes
LINE OUT from the first L1 Pro is line-level.
XLR input on the second L1 Pro is microphone-level
- Solutions
Connect the first L1 Pro LINE OUT to the second L1 Pro Channel 3 input The cable: Female XLR to 1/4-inch (6.3mm) Tip-Ring-Sleeve cable For more details see L1 Pro Daisy Chain
Hiss when connecting a mixer to the L1 Pro Channels 1 or 2 with an XLR cable
- Symptoms
Hiss, noise, clipping
- Possible Causes
No causes provided
- Solutions
Connect the mixer mono output to the L1 Pro Channel 3 input The cable: Female XLR to 1/4-inch (6.3mm) Tip-Ring-Sleeve cable For more details see Mixer to L1 Pro
Feedback Issues
| Collapse all
What causes microphone feedback?
Feedback happens when the sound from the loudspeaker is louder at the microphone than the sound of the voice. If the microphone “hears” more speaker than performer, the system will feed back.
For a full explanation and diagrams, see Feedback / Microphone.
How do I set gain staging to reduce feedback?
Set your source at its loudest performance level, then raise the Trim until you get solid green with occasional yellow (never red). Once Trim is set, use channel volume for mixing — not Trim.
Details for the T4S/T8S
The first thing you do when connecting a sound source to your ToneMatch mixer is set the input trim. This is gain staging. Then you can set the ToneMatch Preset for your source. We'll do both in the short video below.
At the beginning of the video, I'm doing a factory reset so we don't bump into any old settings. You do not have to do a factory reset before you set the input trim on your ToneMatch mixer.
- The trim controls across the top will be different
- The trim controls across the top of your ToneMatch mixer will likely be different. This is because the output levels of your input sources will likely be different. This is normal.
- Mixing - Use the volume controls not the trim controls
- Once you have set the input trim, you should not have to change it until you change the input source (e.g. different microphone, singer, or instrument). Do not use the trim control to change the channel volume. Use the channel volume control.
- Scenes
- Saved Scenes do not capture the trim, channel volume, or Master Volume settings.
Set Up Your Source
Set your source at the maximum that it will be when performing.
- Microphone
- Sing directly into the microphone using close microphone technique (lips just brushing the windscreen). Sing as loudly as you will sing during your performance. You want to set the Trim to work at your maximum volume.
- Instrument
- Turn your input as high as it is likely to go during performance.
Trim Controls
The ToneMatch Mixer[1] trim controls for Channels 1-4 (1-8 for the T8S ToneMatch mixer) provide a significant gain increase when you reach the upper limit. This increase in gain is normal operation.
Most sources like typical microphones and piezo pickup systems can provide enough level without the need to add significant gain from the trim control. Certain sources like passive acoustic guitar pickups require additional gain and in these cases it can be necessary to set the trim level to the upper range of the control. When the trim control is set this high you may notice the gain change. This is normal operation. If you want to run the trim control at lower settings we recommend using a preamp or simple stomp box level booster.
The trim for Aux input channels 5/6 (9/10 for the T8S ToneMatch mixer) do not exhibit the same behavior as the trim controls for Channels 1-4 (1-8 for the T8S ToneMatch mixer). The Aux inputs are designed for line level sources and do not have the same gain staging as channels 5/6 (9/10 for the T8S ToneMatch mixer).
Details for the T1
Here's a quick video to help you set the input trim for a microphone on the T1 ToneMatch Audio Engine. This is called Gain Staging.
- The trim controls across the top will be different
- The trim controls across the top of your T1 ToneMatch Audio Engine will likely be different. This is because the output levels of your input sources will likely be different. This is normal.
- Mixing - Use the volume controls not the trim controls
- Once you have set the input trim, you should not have to change it until you change the input source (e.g. different microphone, singer, or instrument). Do not use the trim control to change the channel volume. Use the channel volume control.
- Scenes
- Saved Scenes do not capture the trim, channel volume, or Master Volume settings.
The same principles apply to an instrument or line-level input.
- Set the source to the highest level you will need during the show
- Set the input trim so that you get solid green, occasional yellow flickers, and never see red.
For more detailed steps for T1, T4S, and T8S, see Feedback / Microphone#Gain Staging.
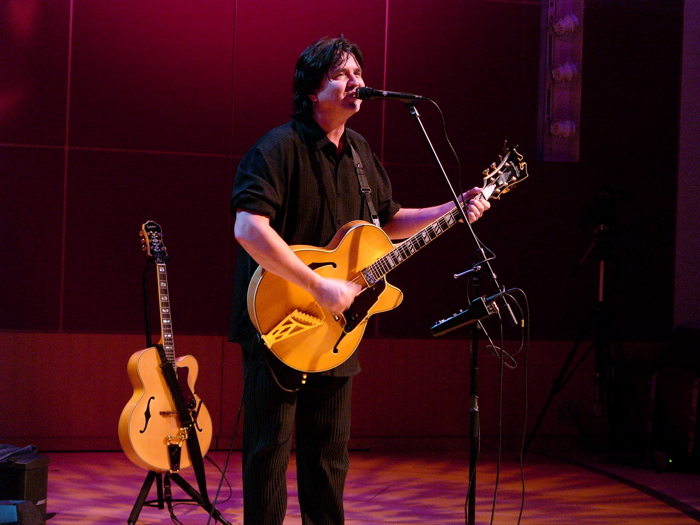
Microphone Technique?
Use close‑microphone technique: lips touching the windscreen. Every halving of distance gives roughly 6 dB more gain before feedback.
Close Microphone Technique details
Get close to the microphone when you want to be loud. No other technique has a big an impact on feedback. Each halving of distance is approximately another 6 dB of gain before feedback. This relationship in physics is known as the Inverse Square Law. This means that the difference between working a microphone at 2 inches, and 1/4 inch is 18 dB, which is more than twice as loud. While good mic technique often involves "working" the microphone at different distances, singers must be mindful of the fact that small changes in distance from the mouth result in very dramatic changes in sound level.
In the feedback diagram at the top, getting close to the microphone means getting more sound from voice which translates to more gain without feedback.
For more, see Feedback / Microphone#Close Microphone Technique.

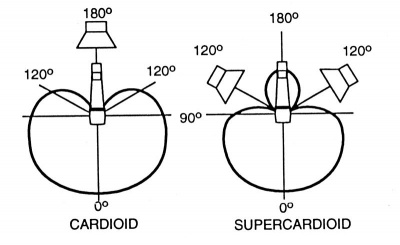
Do directional microphones help with feedback?
Yes. Supercardioid and hypercardioid microphones provide the best gain‑before‑feedback, followed by cardioid. Omnidirectional microphones provide the least.
Details about Directional Microphones
Principles
Use a directional microphone. Hypercardioid is better than cardioid, which is better than omnidirectional. All sound waves impinging on the microphone from a direction other than the intended signal is "noise" and will lower the threshold of feedback.
Directional microphones "collect" less sound from directions other than what they're supposed to amplify (the voice, or an instrument) and hence are less likely to feed back.
In addition, most directional microphones have a strong behavior called proximity effect. This is the strong buildup of bass and low-mid response as the source (say the voice) to microphone distance decreases. For microphones intended to sound natural when the voice is very close -- say one of a number of popular stage vocal microphones -- what this means is that low-to-middle frequencies from sources at a distance, including loudspeakers being used to amplify the voice, are largely rejected by the microphone. This is a real plus in terms of avoiding microphone feedback.
Conversely, an omnidirectional microphone (equal sensitivity to sound coming from any direction) has no proximity effect. This is an advantage often in the studio where the engineer wants consistent tone regardless of distance. But it's a disadvantage on stage in terms of feedback. An omnidirectional mic collects more sound that's not the target, and because it has no proximity effect is more susceptible to feedback at low-to-mid frequencies than a directional mic.
Omnidirectional and Unidirectional Microphones
There are two basic types of microphone — omnidirectional and unidirectional[2].
Omnidirectional Microphone
Omnidirectional mic. It is sensitive to sounds from all directions.
Best to use when more room ambiance is the goal. Direct and ambient sound can be adjusted by moving the mic closer to or further from the sound source.
Unidirectional Microphone
Unidirectional microphones are sensitive to sound coming from only one direction. Examples:
- a vocalist singing directly on axis directly into the microphone
- a guitar amplifier with the microphone aimed directly at the speaker cone
Cardioid
The most common type of unidirectional microphone is called a “cardioid” because its pickup pattern is heart-shaped. It picks up most sound from the front of the microphone and some from the sides.
Although you will get better gain-before-feedback from a cardioid microphone than an omnidirectional microphone, you will get better gain-before-feedback from a supercardioid or hypercardioid microphone (see next section).
Examples of common cardioid microphones (good to great microphones but not necessarily the best for gain-before-feedback with Bose L1 systems)
- Sennheiser e 835, e 935, MD 935
- Shure SM 58, SM 57, Beta 87C
Supercardioid / Hypercardioid
Supercardioid or hypercardioid microphones offer even greater sound isolation through narrower pickup patterns.
Examples of common supercardioid/hypercardioid microphones
- Audix OM 5, OM 3b, OM 6, OM 7, VX 5
- EV N/D 767A
- Neumann KMS 105
- Sennheiser e 845, e 865, e 945, e 965, MD 441, MD 945,
- Shure Beta 58A, Beta 87A
For examples and diagrams, see Feedback / Microphone#Directional Microphones.

How should I place monitors to avoid feedback?
If you are using stage monitors, be sure to place them so they are directing sound at the area of the microphone that rejects the most sound.
Note from Shure.com
- Other variants on the unidirectional polar pattern include supercardioid and hypercardioid options. Both patterns offer narrower front pickup angles than the cardioid – 115 degrees for the supercardioid and 105 degrees for the hypercardioid – alongside greater rejection of ambient sound. Additionally, while the cardioid is least sensitive at the rear (180 degrees off-axis), the supercardioid is least sensitive at 125 degrees and the hypercardioid at 110 degrees. When placed properly they can provide more 'focused' pickup than the cardioid pattern, but they also have less rejection at the rear. If you're using either of these polar patterns on stage with wedge monitors, it's important make sure you avoid placing the wedges directly behind the mic in this instance. Instead, place them either side at the mics least sensitive angle.

How many open microphones can I use before feedback becomes a problem?
Every time you double the number of open microphones, you lose about 3 dB of gain before feedback. Use as few open mics as possible, and mute or gate unused ones.
How should I use EQ to reduce feedback?
Use EQ sparingly. Avoid excessive high‑frequency boost, and use ParaEQ to notch out a single problem frequency if needed.
For step‑by‑step notching instructions, see Feedback / Microphone#Notch Out a Problem Frequency.
Do vocal effects increase feedback?
Yes. Turn off effects until you have stable gain, then add them back one at a time so you can hear their impact.
Do instrument pickups help reduce feedback?
Yes. Pickups provide much higher gain‑before‑feedback than microphones and avoid the distance/position issues of miking an instrument.
Sub1/Sub2

Bose App / Music App / L1 Mix App
As of 2025 The current app for Bose Portable PA is the Bose App.
This applies to all L1 Pro and the S1 Pro+
Get it on the Google Play Store or the Apple App Store.
ToneMatch Mixers
Engineered with a powerful DSP engine and intuitive user control, the T4S/T8S ToneMatch mixers offer studio-quality EQ, dynamics and effects. Sound great with integrated BoseToneMatch processing and zEQ, especially when connected to a Bose L1 or F1 system for full end-to-end tonal control.
read more — T4S/T8S ToneMatch® Mixers