Difference between revisions of "T1 ToneMatch® Audio Engine / USB / Output Stereo to Two L1®s"
m (local images embedded) |
m (→USB to PC) |
||
| (45 intermediate revisions by the same user not shown) | |||
| Line 1: | Line 1: | ||
| − | + | {| | |
| − | + | |- | |
| − | + | | width="300" valign="top" | __TOC__ | |
| − | + | | valign="top" | <!-- [[Image:USBtoStereoPhysical 1.png]] --> | |
| − | <!-- [[Image:USBtoStereoPhysical 1.png]] --> | + | [[Image:USBtoStereoPhysical_3.png|400px]] |
| − | |||
| − | + | [[Image:USBtoStereoL1Compact.png|400px]] | |
| − | + | [[Image:T1F1stereo.png|400px]] | |
| − | |||
| − | |||
| − | + | [[Image:USBtoStereoL1Model I.png|400px]] | |
| − | |||
| − | |||
| − | |||
| − | |||
| − | |||
| + | If you need to playback stereo tracks from a USB from your computer, this how you can do it. | ||
| − | + | NOTE: You will want to control the volume and balance from your computer. It is not convenient to do this from the {{T1}} in this configuration because one of the channels is routed through the {{T1}} Aux buss and the other is through the Master. It is not easy to control both of these at the same time on the {{T1}}. | |
| − | |||
| − | |||
| − | + | |} | |
| − | === Physical Connections === | + | == Equipment Required == |
| − | Make the following connections. If you are running two | + | |
| + | *{{L1 no link}} Classic/Model I or Model 1S or Model II or Compact ({{L1 no link}} LEFT) | ||
| + | *{{L1 no link}} Classic/Model I or Model 1S or Model II or Compact ({{L1 no link}} RIGHT) | ||
| + | |||
| + | <!-- If you have one of each then use the Model II as {{L1 no link}} RIGHT. --> | ||
| + | |||
| + | *{{T1}} | ||
| + | *[[Image:T1 power supplyThumb.jpg|right]] [[T1 ToneMatch® Audio Engine power supply]] (required unless one of your {{L1 no link}}s is a {{Model II}}). | ||
| + | |||
| + | <br> | ||
| + | |||
| + | == Initial Connections == | ||
| + | |||
| + | === Turn down the outputs and volume === | ||
| + | |||
| + | Start with your computer with the volume set all the way off, muted or at least really low. Things can get loud very quickly if you are not careful. | ||
| + | |||
| + | On the {{T1r}} turn down the Master Volume and mute all Channels. | ||
| + | |||
| + | === Physical Connections === | ||
| + | |||
| + | Make the following connections. If you are running two {{Classic}}s or {{Model I}} or {{Compact}} Systems, then you will also need the optional [[T1_ToneMatch%C2%AE_Audio_Engine_power_supply|T1 ToneMatch® Audio Engine power supply]] (not shown below). | ||
| + | |||
| + | [[Image:USBtoStereo 0.png]] | ||
| + | <!-- | ||
| + | http://bose.infopop.cc/eve/forums/a/ga/ul/8771002315/inlineimg/Y/USBtoStereo_0.png | ||
| + | --> | ||
| + | ==== Model II ==== | ||
| + | If one of the {{L1 nl}}s is a {{Model II}} then you will not need the connection marked "To L1 RIGHT". This will be replaced by the ToneMatch® connection to the {{Model II nl}}. | ||
<!-- [[Image:USBtoStereo 0.png]] --> | <!-- [[Image:USBtoStereo 0.png]] --> | ||
| − | |||
| − | == USB to PC == | + | == USB to PC == |
| + | |||
We want to split the USB signal from the computer so that | We want to split the USB signal from the computer so that | ||
| − | |||
| − | |||
| − | |||
| − | |||
| − | |||
| − | |||
| − | |||
| − | |||
| − | |||
| − | === Channel 4/5 === | + | *the Stereo Left channel goes through Channel 4/5 to Aux and from there to an analog connection to an {{L1 no link}} |
| − | * Press Chan 4/5 CH Edit | + | *the Stereo Right channel goes through to Master and from there to an analog connection or digital connection to another L1™ |
| − | * Rotate the | + | |
| − | * Set the Level to 0% (not bypass) | + | === Prefs === |
| − | * Set the Tap to '''Pre''' | + | |
| − | <!-- [[Image:USBtoStereo 2.png]] --> | + | *Turn the main selector to '''Prefs'''. |
| − | http://bose.infopop.cc/eve/forums/a/ga/ul/4081002315/inlineimg/Y/USBtoStereo_2.png | + | *Select '''USB from PC''' |
| + | |||
| + | [[Image:T1PrefsUSBfromPC.png|400px]] | ||
| + | |||
| + | *Set Left: Ch 4/5 | ||
| + | *Set Right: Master <!-- --> | ||
| + | |||
| + | [[Image:USBtoStereo 1.png]] | ||
| + | <!-- | ||
| + | http://bose.infopop.cc/eve/forums/a/ga/ul/7971002315/inlineimg/Y/USBtoStereo_1.png | ||
| + | --> | ||
| + | === Channel 4/5 === | ||
| + | |||
| + | *Press Chan 4/5 CH Edit | ||
| + | *Rotate the selector to '''Aux''' | ||
| + | *Set the Level to 0% (not bypass) | ||
| + | *Set the Tap to '''Pre''' | ||
| + | *'''Mute this Channel'''. You can turn down the level as well. It you leave the Mute off then you will be sending both Left and Right stereo signals to the Main output. <!-- [[Image:USBtoStereo 2.png]] --> | ||
| + | |||
| + | [[Image:USBtoStereo 2.png]] | ||
| + | <!-- | ||
| + | http://bose.infopop.cc/eve/forums/a/ga/ul/4081002315/inlineimg/Y/USBtoStereo_2.png | ||
| + | --> | ||
| + | ==== Setting the Relative Levels ==== | ||
| + | |||
| + | *On the Computer: Start playing a track. Turn up the volume on the computer a little. You won't hear anything yet. | ||
| + | *On the {{T1r}} Turn up the Master Volume. You should be hearing the Stereo Right channel. | ||
| + | |||
| + | Work the volume on the computer and the {{T1r}} until you are happy with a workable volume level. | ||
| + | |||
| + | *On the {{T1r}} Turn up the Aux Level. Your setting will look something like this. The actual value you set may be different. That's okay. | ||
| + | [[Image:USBtoStereo 3.png]] | ||
| + | <!-- | ||
| + | http://bose.infopop.cc/eve/forums/a/ga/ul/6181002315/inlineimg/Y/USBtoStereo_3.png | ||
| + | --> | ||
| + | |||
| + | This is the Stereo Left channel. Bring up the volume until it matches the output from the Master. Note: This Aux volume is completely independent of the Master volume. This is why you want to set it to be equally balanced with the Master. You will then be able to control the balance and level from the computer. | ||
| + | |||
| + | === Download Shared Scene === | ||
| + | |||
| + | Here is a Shared Scene you can load into your {{T1}}. If you have been following along and have set up our {{T1 nl}} with the settings above, you do not need to download this Shared Scene. I just included this as a convenience in case you wanted to try the Shared Scene system. | ||
| + | |||
| + | This scene has very generic settings for Channels 1,2 and 3 and the settings discussed in this article for Channel 4/5. | ||
| + | |||
| + | *Channels 1,2,3 are set to Vocal Microphones: Handheld Microphones - no effects, muted. | ||
| + | *Channel 4/5 is set as described above with USB routed to 4/5 routed to Aux. This is muted so that this Channel is '''not''' sent to the Main output. | ||
| + | |||
| + | Please read the entire article before using this Shared Scene. It is provided as a convenience to save you some time is you want to have the same settings. | ||
| + | |||
| + | ==== Warning ==== | ||
| + | |||
| + | This is an experimental file and I strongly recommend that you back up all your scenes before loading this one, just in case you overwrite something by accident. I have tested this and it works in my environment, but I cannot accept responsibility for any issues you may have when you apply it to your {{T1 nl}} | ||
| + | |||
| + | You will need to understand how to use the L1 Software Updater program to load this Shared Scene. | ||
| + | |||
| + | ==== Things you must have and understand to use a Shared Scene ==== | ||
| + | |||
| + | {{:Firmware Prerequisites}} | ||
| + | |||
| + | {{:Firmware Update Warning}} | ||
| + | |||
| + | ==== Shared Scene Download ==== | ||
| + | |||
| + | Here is a very simple Scene that includes the setup described above. <!--[http://bose.infopop.cc/eve/forums/a/ga/ul/4641045315/Shared_Scene_USBtoStereoL1s.BOS Shared Scene USB to Stereo L1s] | ||
| + | --> | ||
| + | |||
| + | [[Media:Shared_Scene_USBtoStereoL1s.BOS]] | ||
| + | |||
| + | == Variations == | ||
| + | |||
| + | === One Classic / Model I and One Model II === | ||
| + | |||
| + | [[Image:USBtoStereoPhysical 2.png]] | ||
| − | + | On the {{Classic nl}} / {{Model I nl}} set the Power Stand Input Level to 3. You may want to fine tune that a bit but it should be a reasonable starting point. | |
| − | + | === Two Model IIs === | |
| − | |||
| − | |||
| − | |||
| − | |||
| − | + | [[Image:USBtoStereoPhysical 3.png]] | |
| + | For the {{Model II}} with the Analog connection - try setting the Analog input trim 3. You may want to fine tune that a bit but it should be a reasonable starting point. | ||
| − | + | === Two Model 1S === | |
| − | + | [[Image:USBtoStereoPhysical 3.png]] | |
| − | |||
| − | |||
| − | |||
| − | + | For the {{Model II}} with the Analog connection - try setting the Analog input trim 3. You may want to fine tune that a bit but it should be a reasonable starting point. | |
| − | |||
| − | |||
| + | === Two Compacts === | ||
| + | {{:Compact Stereo with T1 ToneMatch® Audio Engine}} | ||
| + | === Two F1 === | ||
| + | [[Image:T1F1stereo.png]] | ||
---- | ---- | ||
| + | [[Category:DJ]] | ||
| + | [[Category:Playback]] | ||
| + | [[Category:Shared_Scenes]] | ||
| + | [[Category:Stereo]] | ||
[[Category:T1]] | [[Category:T1]] | ||
| − | [[Category: | + | [[Category:F1]] |
Latest revision as of 16:44, 4 September 2023
|
If you need to playback stereo tracks from a USB from your computer, this how you can do it. NOTE: You will want to control the volume and balance from your computer. It is not convenient to do this from the T1 ToneMatch Audio Engine in this configuration because one of the channels is routed through the T1 ToneMatch Audio Engine Aux buss and the other is through the Master. It is not easy to control both of these at the same time on the T1 ToneMatch Audio Engine. |
Equipment Required
- L1® Classic/Model I or Model 1S or Model II or Compact (L1® LEFT)
- L1® Classic/Model I or Model 1S or Model II or Compact (L1® RIGHT)
- T1 ToneMatch Audio Engine
- T1 ToneMatch® Audio Engine power supply (required unless one of your L1®s is a L1 Model II).
Initial Connections
Turn down the outputs and volume
Start with your computer with the volume set all the way off, muted or at least really low. Things can get loud very quickly if you are not careful.
On the T1® turn down the Master Volume and mute all Channels.
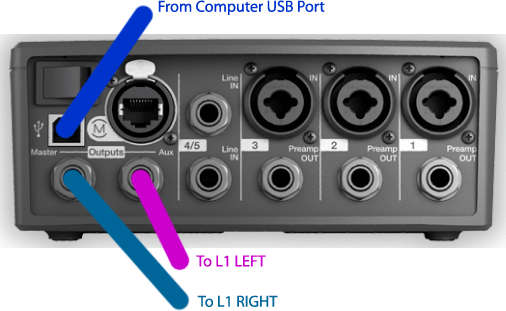
Physical Connections
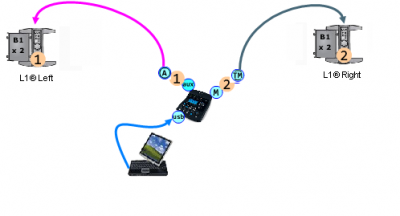
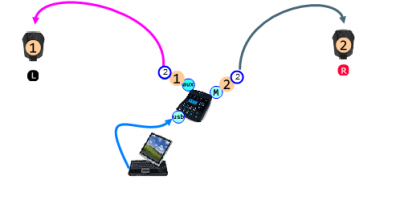
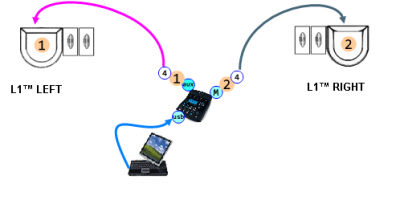
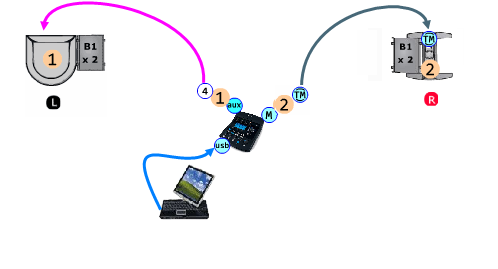
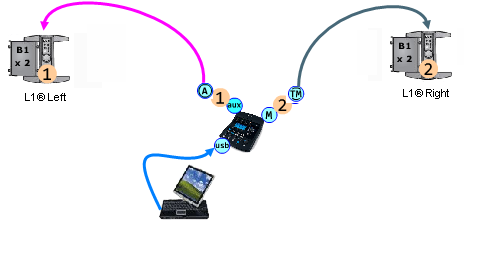
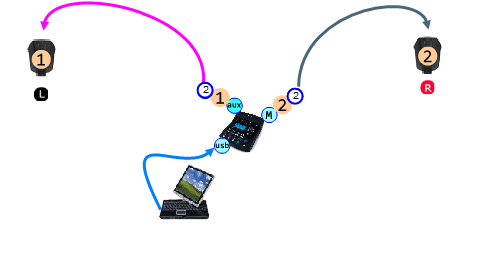
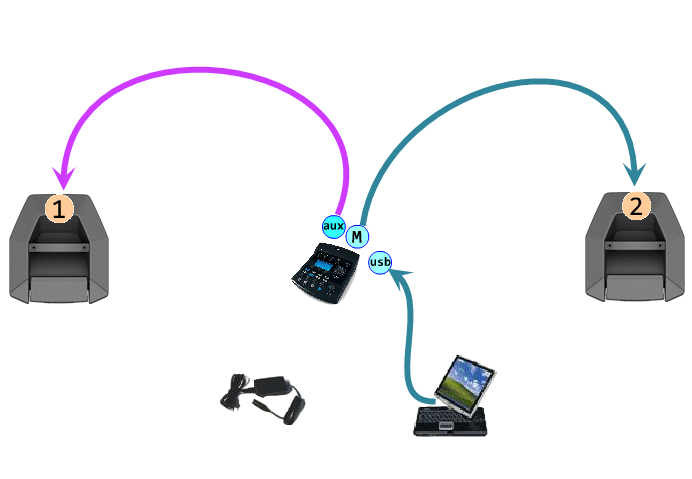
Make the following connections. If you are running two L1 Classics or L1 Model I or L1 Compact Systems, then you will also need the optional T1 ToneMatch® Audio Engine power supply (not shown below).
Model II
If one of the L1®s is a L1 Model II then you will not need the connection marked "To L1 RIGHT". This will be replaced by the ToneMatch® connection to the L1® Model II.
USB to PC
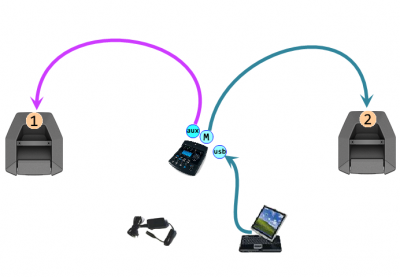
We want to split the USB signal from the computer so that
- the Stereo Left channel goes through Channel 4/5 to Aux and from there to an analog connection to an L1®
- the Stereo Right channel goes through to Master and from there to an analog connection or digital connection to another L1™
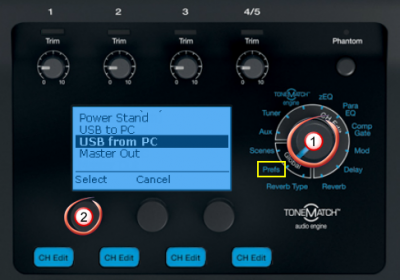
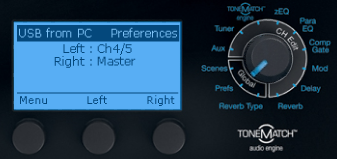
Prefs
- Turn the main selector to Prefs.
- Select USB from PC
- Set Left: Ch 4/5
- Set Right: Master
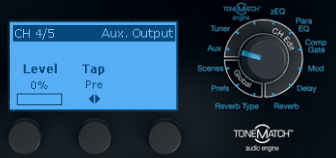
Channel 4/5
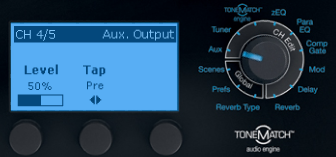
- Press Chan 4/5 CH Edit
- Rotate the selector to Aux
- Set the Level to 0% (not bypass)
- Set the Tap to Pre
- Mute this Channel. You can turn down the level as well. It you leave the Mute off then you will be sending both Left and Right stereo signals to the Main output.
Setting the Relative Levels
- On the Computer: Start playing a track. Turn up the volume on the computer a little. You won't hear anything yet.
- On the T1® Turn up the Master Volume. You should be hearing the Stereo Right channel.
Work the volume on the computer and the T1® until you are happy with a workable volume level.
- On the T1® Turn up the Aux Level. Your setting will look something like this. The actual value you set may be different. That's okay.
This is the Stereo Left channel. Bring up the volume until it matches the output from the Master. Note: This Aux volume is completely independent of the Master volume. This is why you want to set it to be equally balanced with the Master. You will then be able to control the balance and level from the computer.
Here is a Shared Scene you can load into your T1 ToneMatch Audio Engine. If you have been following along and have set up our T1 ToneMatch® Audio Engine with the settings above, you do not need to download this Shared Scene. I just included this as a convenience in case you wanted to try the Shared Scene system.
This scene has very generic settings for Channels 1,2 and 3 and the settings discussed in this article for Channel 4/5.
- Channels 1,2,3 are set to Vocal Microphones: Handheld Microphones - no effects, muted.
- Channel 4/5 is set as described above with USB routed to 4/5 routed to Aux. This is muted so that this Channel is not sent to the Main output.
Please read the entire article before using this Shared Scene. It is provided as a convenience to save you some time is you want to have the same settings.
Warning
This is an experimental file and I strongly recommend that you back up all your scenes before loading this one, just in case you overwrite something by accident. I have tested this and it works in my environment, but I cannot accept responsibility for any issues you may have when you apply it to your T1 ToneMatch® Audio Engine
You will need to understand how to use the L1 Software Updater program to load this Shared Scene.
|
ToneMatch® Updater Software application. (two versions available)
If you have questions please see ToneMatch Updater discussion.
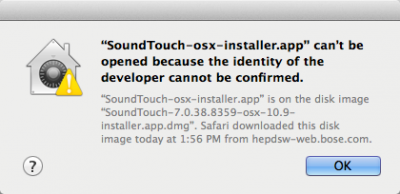
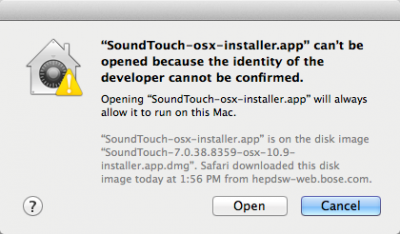
macOS Issues[Filename] can't be opened because the identity of the developer cannot be confirmedIf you see "[Filename] can't be opened because the identity of the developer cannot be confirmed" message displayed Mac OSX users may see this message when trying to install a Bose app. If this message appears, try the following: Mac users may need to hold the Control key (Ctrl) when opening the file. Various versions of the Mac OS cannot identify Bose as a developer. The Mountain Lion version of OS X (10.8) includes a feature called Gatekeeper to protect users from installing applications of non-Apple identified developers. The Mavericks version of OS X (10.9.5) temporarily cannot identify Bose as a developer as well. To open the application, follow these steps:
In the menu that appears, select Open at the top of the list A confirmation window will appear. Select Open Without Control click:
With Control click: More information on Gatekeeper can be found at http://support.apple.com/kb/HT5290
|
Warning
After you update the T1 ToneMatch Audio Engine or L1 Model II firmware, if you see a window on the PC that says the update was not successful, you should:
- turn the L1 and T1 off
- wait three seconds
- then turn the L1 and T1 back on
Do this before trying the update again!
This allows the L1 and T1s to re-establish a good copy of the software.
Source: If your firmware update is not successful - Caution
Here is a very simple Scene that includes the setup described above.
Media:Shared_Scene_USBtoStereoL1s.BOS
Variations
One Classic / Model I and One Model II
On the L1® Classic / L1® Model I set the Power Stand Input Level to 3. You may want to fine tune that a bit but it should be a reasonable starting point.
Two Model IIs
For the L1 Model II with the Analog connection - try setting the Analog input trim 3. You may want to fine tune that a bit but it should be a reasonable starting point.
Two Model 1S
For the L1 Model II with the Analog connection - try setting the Analog input trim 3. You may want to fine tune that a bit but it should be a reasonable starting point.
Two Compacts
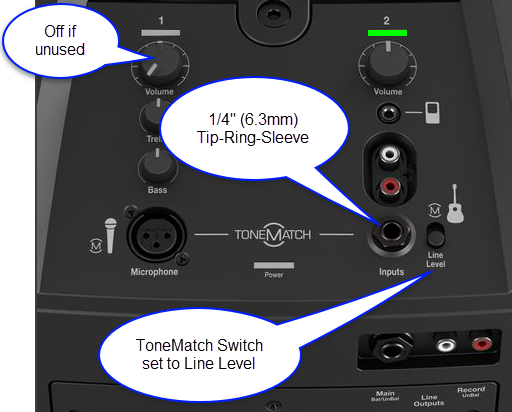
For the L1 Compact connect to Channel 2 with the volume straight up. You may want to fine tune that a bit but it should be a reasonable starting point.
